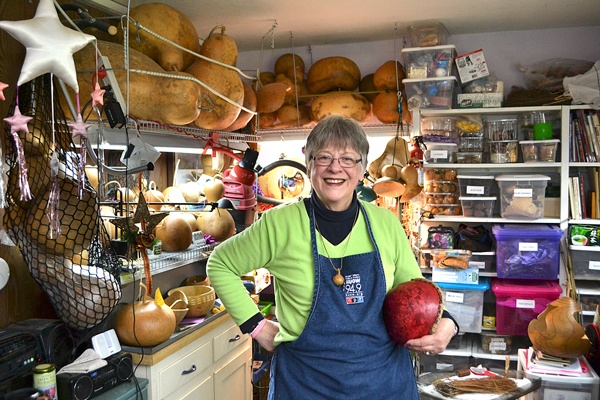
Before you dig into dinner or the garden, there may be some ripe art possibilities.
Sequim artist Roberta Cooper designs something unconventional with gourds.
“The most common comment I get is that they are gorgeous and I have to agree,” Cooper said.
As an artist most her life, Cooper first focused on macrame, fiber art and jewelry before the gourds on an artist’s table at a Kingston crafts fair caught her eye.
“I asked if she did classes, and she said no, but she helped me get started,” she said.
Cooper found the transition to the different art style an easy one using woodworking tools.
“I like the variety,” she said of gourds. “I don’t just like doing production like I was doing in jewelry.”
Much of Cooper’s work draws inspiration from a trip to Yellowstone National Park where she snapped a lot of pictures.
“A lot of the designs are similar in nature,” she said.
Cooper also looks in various gourd books to see if any designs inspire something in her.
Before becoming a gourd artist, you must find the right gourds.
1. Choose a gourd
Cooper said the most common question she’s asked is if she grows her own gourds. She doesn’t: Cooper finds local gourds are tasty but they don’t grow as strong a shell due to the climate here. “It takes a hot, dry climate for thick, hard gourds,” she said.
Most of her gourds come by mail order, predominately from California. They can be ordered either clean or dirty with dirty gourds coming often cheaper. The cost runs from a few dollars to about $15 each.
Cooper said gourds are easy to clean and can be put into a tub with warm water and soap. Dirt and mold stains can be taken off with a metal scrubber.
Cooper said artists often choose to leave some of the mold markings because they can show character.
From looking at a gourd, Cooper said she can tell what its weight will be simply by its color. “You can tell from lightness if it’s going to be heavy or not,” she said.
Cooper hasn’t dabbled in working the larger gourds that have sat up high in her studio for several years.
She learned a lesson — that a “giant gourd sale” means large in size, not savings.
2. Getting inside
Gourds can become rattles, bowls, oil lamps, percussion instruments, ornaments and simply decorative pieces.
“It’s individual to each one,” Cooper said. “Some I have an idea for from the beginning and it happens a lot where you let some sit and you think about them over time.”
Once Cooper makes a decision, she draws on the gourd in pencil where she’ll make an incision, such as around the top. She’ll use a crafting knife or small jigsaw to cut open the gourd slowly.
Inside, artists will see seeds that some may remove and others keep for other uses. Cooper takes them for pieces of jewelry and/or embellishments on the outside of the gourd. “I don’t throw anything away,” she said.
Some of Cooper’s pieces have openings in multiple spots, so the process of tracing stays the same. For all gourds, even oddly shaped ones, she recommends using a compass to keep lines even. This is especially handy when tracing templates, i.e., weaves and circles.
After cutting an opening, Cooper suggests using either a scraper or sandpaper on a drill bit or an inflatable drum on a grinding tool to sand the insides. “But in some instances, you may like the natural landscape inside,” she said.
3. Bringing out the color
Before choosing a color and technique, Cooper often uses a light transparent spray to coat the inside of the gourd to keep the plant’s fine dust from clumping.
When Cooper first started coloring her gourds, she used acrylics that covered much of the pieces’ natural beauty. She’s even come back to earlier works and redone some of them to make completely different pieces, such as reshaping the tops and removing embellishments.
Her work now ranges in colors and methods. For some gourds, she uses a black spray paint, safely applied outside while wearing a mask.
Some gourds she hand paints using household dyes, such as Rit dyes, while for others she uses shoe dye.
For added effects, Cooper opts for a wood burner to create darker, deeper lines. A few times she’s drawn gold lines with a marker pen. She also uses a wood chisel to create decorative divots where she digs shallowly into the gourd and then cuts toward the divot evenly.
“You could choose to do it after the color is on to have a contrast with the natural color underneath,” she said.
4. Embellishing the gourd
Once the gourd is cut, colored and designed, the topical finish is left open to each designer.
One of Cooper’s personal touches is using waxed linen strings. She punches small holes along an opening at the top and weaves the strings in and out using a tapestry needle that isn’t sharp. For safety, she wears a rubber thimble. At this stage, embellished or not, the finished gourd is ready for display or use.
Cooper is a member of Sequim Arts and said part of her mission is to educate people. During the studio tour, set during Lavender Weekend, she always is asked a lot of questions about her process.
She works on her art three days a week and her pieces are on display at the Bluewater Artworks gallery in Poulsbo. Her studio usually is open 1-5 p.m. Fridays and Saturdays: She recommends calling ahead, at 582-9549.


